

This document is going to show you how to set up your own "watcher node."
As a refresher:
Imagine a blockchain as a series of digital "blocks" that contain lists of transactions. Each time a transaction is made, it's verified by the nodes in the network and then added to a new block. This new block is linked to the previous one, forming a chain of blocks—hence the name "blockchain."
The unique thing about blockchain is its decentralization. Unlike conventional databases managed by a central authority, like a bank or government, a blockchain is maintained collectively by the nodes. This makes the system more transparent and secure because no single entity has complete control over the entire blockchain. It's also more difficult to tamper with: to change one block, you'd need to change every block that comes after it, which would require the consensus of the majority of nodes—a practically impossible task.
One more crucial feature is that once a block has been added to the blockchain, it can't be changed or removed. This makes the blockchain a tamper-proof, "immutable" record of all transactions that have ever occurred on that network.
In summary, a blockchain is a decentralized, transparent, and immutable digital ledger, maintained by a network of nodes. It serves as the foundational technology for various applications, from cryptocurrencies like Bitcoin and Kinesis to more complex systems for supply chain management, digital voting, and beyond.
What is a Watcher Node?
Kinesis is based on the Stellar blockchain, and under that system there are a set of trusted nodes that vote on consensus. Without getting lost in the weeds: every trusted node in the system looks at each transaction that is presented, offers its opinion on whether a given transaction is valid, and if the correct majority of nodes think a transaction is valid then it is queued for inclusion in the next block. These blocks are created about once every 5 seconds.
When you are running a Watcher Node, you are maintaining a copy of the blockchain that is up-to-date at all times, but your node is not allowed to vote on the legitimacy of the transactions. It's just keeping a local copy for you, or for those you choose to share it with.
What will this look like?
You can visit https://watcher.aboutkinesis.com/ to see my node if you'd like, but it looks like this once you've entered all the details:

On my node, or on your own, this will produce an error until you point it at your local copy of the blockchain. So where it says "Set Custom Network" on the upper right you'll need enter your local URL (probably http://localhost:8000 for KAU or https://localhost:8001 for KAG), though on my node you can enter https://kau.aboutkinesis.com or https://kag.aboutkinesis.com in order to access those blockchains.
This is the Stellar Explorer that we will be installing at the end of this tutorial. It's generic in that Kinesis doesn't make it, but it understands Stellar-based blockchains like the Kinesis blockchain. If you dig through transactions you'll see references to lumens and stroops instead of KAU and KAG, but that's because the software is generic and designed for Stellar and doesn't know what KAU and KAG are - it just sees Stellar. It works well enough for our needs, and it allows us to export all blockchain transactions into Excel for further analysis which can be useful for reconciling the blockchain against the audits if you choose to do so for your own due diligence.
If you want to use an explorer that's customized for the Kinesis blockchain, the official explorer is a great place to start: https://explorer.kinesis.money/
The big advantage of using a separate explorer is that it enhances legitimacy. If Kinesis were up to no good, they could conceivably modify their explorer to hide their misdeeds. Using a third party tool that's open source that we know just reports on the blockchain removes that potential risk.
Required Skills
You need to be familiar with the command line. I will be illustrating this process using the Ubuntu command line, but you don't really need to use Linux at all. You do need to be somewhat comfortable with working from a command line however.
You also need come familiarity with Docker and Git.
Required Hardware
I run this as its own virtual machine, but you can run this locally on your Windows or Mac computer if you like using Docker. Just make sure you've got enough disk space to to hold the blockchain data - I know for sure that 100 gigs is not enough, but for now 200 gigs might be plenty. The node I'll be building here has a couple of terabytes available, but I will extend that if the data requires as Indonesia takes off.
Required Software
Git
Every blockchain node needs to be running the same software, and git is central repository that maintains this code. One command will get you a copy of the current code, and another one-line command will update the code once an update has been created.
Docker and Docker-Compose
In the olden days someone like me would need to install applications manually. So for a project like this I would need to install a database, and a web server, and all the tools required to manage the code that actually runs the blockchain. Then I would need to configure them correctly, and there would be hundreds of variables that would be different between what I was running and what the developer was running, and diagnosing problems could be difficult.
Nowadays lots of software is "containerized." So for example, the Kinesis Watcher node you'll be building will require a database as part of the core infrastructure, and the docker-compose process just sets one up for you that's been tested with the existing code. When you walk through this process you're getting the same version of the code and required applications that everyone gets. When the project is updated, the apps and containers will be updated automatically.
This is just a much simpler way of installing and managing the system. You just need to learn another tool.
(There's more than this, but this should suffice to explain what we're doing, and why.)
With that out of the way, let's get started:
Install Docker
You'll need to choose how to install Docker, which means you probably want to install Docker Desktop if you're installing this on a Windows or Mac. The documentation is here: https://docs.docker.com/engine/install/
I installed docker directly on Linux, which meant I needed to install docker-compose separately. If you installed Docker Desktop then this step isn't necessary; if not then the instructions here are likely useful: https://docs.docker.com/compose/install/
In Ubuntu, a simple
Got things going.
Install Git
Instructions are here: https://github.com/git-guides/install-git
On ubuntu:
Install the Watcher Itself
And now, we can start:
The code for the Kinesis watcher node is located here: https://github.com/bullioncapital/nodes
We will be performing the process as it exists in August of 2023 for this tutorial. What I'm really doing is walking through the steps on that page, as many seem to get confused. If things change in the future, just follow the directions on that page. It's well documented, but the instructions assume a certain level of competence with the command line, git, and docker. The additional value I'm creating here is that I'm walking you through things more slowly, so you don't need the same level of experience to get started.
Again, I'm walking through this using Ubuntu. If you're using another version of Linux you may not need the "sudo" statements as you may just be running as a user with full permissions. If you're running this locally on your Windows or Mac computer this likely isn't required either, but you'll be entering the commands in the Git Bash terminal window (again, without the 'sudo' command).
We will be installing the KAG blockchain in this tutorial. All the responses we see in my terminal will be from the KAG blockchain, but I will try and document both blockchain installations.
I would install one blockchain first, then redo the process for the second blockchain should you choose to run both.
0. Clone the repository

On the git repository, click the green button, then click the copy button on the popup (highlighted) to copy the address to your clipboard.
(Note that when I say "paste" in the remainder of this document, the way you past into a Linux shell or Git Bash is to right click in the window. That's it - right-click is "paste the text in my clipboard wherever the cursor is," and highlighting text and pressing the middle button is how you copy.)
Now, open your shell, and type "git clone " and paste the address after:
That will create the codebase for the watcher node in your current directory. If this is the first thing you've installed, then you should see a nodes directory directly below where you ran this command (probably your home directory). In linux, the ls command lists the contents of a directory, and cd changes directories. Entering cd by itself takes you back to your home directory.

I've already installed the stellarexplorer as well, but we'll get to that last.
Now, move into that nodes directory:

These are the contents of the folder that git created for you - this is the code to set up and configure your watcher node. Using the default Ubuntu shell color scheme, green represents scripts you can run, blue represents directories, and white represents other files. So the README.md file has the same directions you see on the github project page, and the docker-compose.yml file will be used by the next command to generate the docker containers we need to run the watcher.
So let's get started.
1. Starting the services
In the command prompt, to bootstrap the KAG node, type the following:

The first time you do this you'll see more output than this - don't worry about that. As long as everything says "done" then you're fine.
If you want to create the KAU watcher instead, then you need to enter kau-mainnet and 8000 on that setup.sh command. For the remainder of the steps below, you will need to enter kau-mainnet instead of kag-mainnet. If you are installing both blockchains, then you'll go through this process once with the KAG network code, then again with the KAU network code.
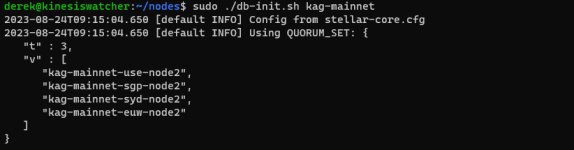
2. Database initialization

This will throw out a couple of screens of information, that will finish with something that looks like
Now we double-check that by typing:
This gets us into the Database container. Once there we type:
If the database was created correctly, it should be clear from the output:

If you do not see two lines representing Core and Horizon database installations, then the last command failed. Diagnose and fix the problem before continuing.
Now, press control-d or type exit to get out of the database docker container and back into your regular command shell.
Now, if you're not sure where you are, I'd like you to look at the previous screenshot above. Shells try hard to make it clear where you are and who you are (as this affects what powers you have), so in the first line of the screenshot above the shell is telling me:
Conceptually, docker creates separate computers that you will be controlling. We'll be hopping in and out of them throughout this tutorial via the exec.sh script, so if you get an error you likely just lost track of where you are.
Again, the way to exit from one command prompt to another is to type 'exit' or use the shortcut control-d.
3. Catching Up
This step is a bit more complicated. What we need to do here conceptually is as follows:
For the kag-mainnet, we need to open this page: https://kag-mainnet-arch-syd-node2.kinesisgroup.io/.well-known/stellar-history.json. For KAU, you can click here instead.
This is the number you're looking for:

This number will not be current when you install your node! A new block is created approximately every 5 seconds, and you want the current number. So open the page, and make a note of it.
Now, we will move into the Core docker container again and perform the catchup:
Now, once you're in the core (as indicated by the change in the prompt), type the following command (replacing 27552127 with the block number you got above):
(Note that that's the current blockchain number, a forward slash, and the number 512.)
In a few seconds the process will finish, and as scary as "Application destructing" and "Application destroyed" may sound, if you see the following results then the process was a success.

Remember to type "exit" or control-d to exit.
Now, this step is a bit more complex. When I do this (I've done this a few times) I tend to type this up in a text document, then copy it and right-click it in a terminal to paste it.
So, enter the Horizon instance:
And once there, enter the following, changing it as is appropriate for your installation:
Base Command from the github documentation
That's kind of ugly, right? LEDGER_MAX there is a variable that's replaced with whatever the current block number is that you found above. $LEDGER_MIN is probably 2 if you want the whole blockchain. So in my case this would be:
Now, if you wanted to you could probably just remove the variables and insert the numbers directly:
Whatever you want to do, go ahead and paste that into your terminal window. Then go grab a coffee or go for a run or something.
This is going to run for a long time - hours, maybe more. Be patient. At least it tells you something about where it is in the process.

As a reference, I rebuilt my KAU node yesterday, and I added --parallel-workers 4 to the command to run faster, and it took somewhere around 18 hours to complete. That's on a reasonably fast computer (I only gave that virtual machine 4 cores) and most of the time the unix load was around 11 or 12. It ran fine, but it takes a while, and if you're running it with one worker instead of 4 it will take longer still.
It's fine. Hopefully you only need to do this once.
I'll stop here and wait for the process to continue before resuming in the next post.
As a refresher:
What is a Blockchain?
At its core, a blockchain is a digital ledger or record-keeping system. But instead of being stored in one place like a traditional database, this ledger is distributed across multiple computers, known as nodes, around the world. Each of these nodes has a complete or partial copy of the blockchain, and they work together to maintain and update this ledger.Imagine a blockchain as a series of digital "blocks" that contain lists of transactions. Each time a transaction is made, it's verified by the nodes in the network and then added to a new block. This new block is linked to the previous one, forming a chain of blocks—hence the name "blockchain."
The unique thing about blockchain is its decentralization. Unlike conventional databases managed by a central authority, like a bank or government, a blockchain is maintained collectively by the nodes. This makes the system more transparent and secure because no single entity has complete control over the entire blockchain. It's also more difficult to tamper with: to change one block, you'd need to change every block that comes after it, which would require the consensus of the majority of nodes—a practically impossible task.
One more crucial feature is that once a block has been added to the blockchain, it can't be changed or removed. This makes the blockchain a tamper-proof, "immutable" record of all transactions that have ever occurred on that network.
In summary, a blockchain is a decentralized, transparent, and immutable digital ledger, maintained by a network of nodes. It serves as the foundational technology for various applications, from cryptocurrencies like Bitcoin and Kinesis to more complex systems for supply chain management, digital voting, and beyond.
What is a Watcher Node?
Kinesis is based on the Stellar blockchain, and under that system there are a set of trusted nodes that vote on consensus. Without getting lost in the weeds: every trusted node in the system looks at each transaction that is presented, offers its opinion on whether a given transaction is valid, and if the correct majority of nodes think a transaction is valid then it is queued for inclusion in the next block. These blocks are created about once every 5 seconds.
When you are running a Watcher Node, you are maintaining a copy of the blockchain that is up-to-date at all times, but your node is not allowed to vote on the legitimacy of the transactions. It's just keeping a local copy for you, or for those you choose to share it with.
What will this look like?
You can visit https://watcher.aboutkinesis.com/ to see my node if you'd like, but it looks like this once you've entered all the details:
On my node, or on your own, this will produce an error until you point it at your local copy of the blockchain. So where it says "Set Custom Network" on the upper right you'll need enter your local URL (probably http://localhost:8000 for KAU or https://localhost:8001 for KAG), though on my node you can enter https://kau.aboutkinesis.com or https://kag.aboutkinesis.com in order to access those blockchains.
This is the Stellar Explorer that we will be installing at the end of this tutorial. It's generic in that Kinesis doesn't make it, but it understands Stellar-based blockchains like the Kinesis blockchain. If you dig through transactions you'll see references to lumens and stroops instead of KAU and KAG, but that's because the software is generic and designed for Stellar and doesn't know what KAU and KAG are - it just sees Stellar. It works well enough for our needs, and it allows us to export all blockchain transactions into Excel for further analysis which can be useful for reconciling the blockchain against the audits if you choose to do so for your own due diligence.
If you want to use an explorer that's customized for the Kinesis blockchain, the official explorer is a great place to start: https://explorer.kinesis.money/
The big advantage of using a separate explorer is that it enhances legitimacy. If Kinesis were up to no good, they could conceivably modify their explorer to hide their misdeeds. Using a third party tool that's open source that we know just reports on the blockchain removes that potential risk.
Required Skills
You need to be familiar with the command line. I will be illustrating this process using the Ubuntu command line, but you don't really need to use Linux at all. You do need to be somewhat comfortable with working from a command line however.
You also need come familiarity with Docker and Git.
Required Hardware
I run this as its own virtual machine, but you can run this locally on your Windows or Mac computer if you like using Docker. Just make sure you've got enough disk space to to hold the blockchain data - I know for sure that 100 gigs is not enough, but for now 200 gigs might be plenty. The node I'll be building here has a couple of terabytes available, but I will extend that if the data requires as Indonesia takes off.
Required Software
Git
Every blockchain node needs to be running the same software, and git is central repository that maintains this code. One command will get you a copy of the current code, and another one-line command will update the code once an update has been created.
Docker and Docker-Compose
In the olden days someone like me would need to install applications manually. So for a project like this I would need to install a database, and a web server, and all the tools required to manage the code that actually runs the blockchain. Then I would need to configure them correctly, and there would be hundreds of variables that would be different between what I was running and what the developer was running, and diagnosing problems could be difficult.
Nowadays lots of software is "containerized." So for example, the Kinesis Watcher node you'll be building will require a database as part of the core infrastructure, and the docker-compose process just sets one up for you that's been tested with the existing code. When you walk through this process you're getting the same version of the code and required applications that everyone gets. When the project is updated, the apps and containers will be updated automatically.
This is just a much simpler way of installing and managing the system. You just need to learn another tool.
(There's more than this, but this should suffice to explain what we're doing, and why.)
With that out of the way, let's get started:
Install Docker
You'll need to choose how to install Docker, which means you probably want to install Docker Desktop if you're installing this on a Windows or Mac. The documentation is here: https://docs.docker.com/engine/install/
I installed docker directly on Linux, which meant I needed to install docker-compose separately. If you installed Docker Desktop then this step isn't necessary; if not then the instructions here are likely useful: https://docs.docker.com/compose/install/
In Ubuntu, a simple
sudo apt install docker-composeGot things going.
Install Git
Instructions are here: https://github.com/git-guides/install-git
On ubuntu:
Bash:
sudo apt-get install git-allInstall the Watcher Itself
And now, we can start:
The code for the Kinesis watcher node is located here: https://github.com/bullioncapital/nodes
We will be performing the process as it exists in August of 2023 for this tutorial. What I'm really doing is walking through the steps on that page, as many seem to get confused. If things change in the future, just follow the directions on that page. It's well documented, but the instructions assume a certain level of competence with the command line, git, and docker. The additional value I'm creating here is that I'm walking you through things more slowly, so you don't need the same level of experience to get started.
Again, I'm walking through this using Ubuntu. If you're using another version of Linux you may not need the "sudo" statements as you may just be running as a user with full permissions. If you're running this locally on your Windows or Mac computer this likely isn't required either, but you'll be entering the commands in the Git Bash terminal window (again, without the 'sudo' command).
We will be installing the KAG blockchain in this tutorial. All the responses we see in my terminal will be from the KAG blockchain, but I will try and document both blockchain installations.
I would install one blockchain first, then redo the process for the second blockchain should you choose to run both.
0. Clone the repository
On the git repository, click the green button, then click the copy button on the popup (highlighted) to copy the address to your clipboard.
(Note that when I say "paste" in the remainder of this document, the way you past into a Linux shell or Git Bash is to right click in the window. That's it - right-click is "paste the text in my clipboard wherever the cursor is," and highlighting text and pressing the middle button is how you copy.)
Now, open your shell, and type "git clone " and paste the address after:
Bash:
git clone https://github.com/bullioncapital/nodesThat will create the codebase for the watcher node in your current directory. If this is the first thing you've installed, then you should see a nodes directory directly below where you ran this command (probably your home directory). In linux, the ls command lists the contents of a directory, and cd changes directories. Entering cd by itself takes you back to your home directory.
I've already installed the stellarexplorer as well, but we'll get to that last.
Now, move into that nodes directory:
Bash:
cd nodesThese are the contents of the folder that git created for you - this is the code to set up and configure your watcher node. Using the default Ubuntu shell color scheme, green represents scripts you can run, blue represents directories, and white represents other files. So the README.md file has the same directions you see on the github project page, and the docker-compose.yml file will be used by the next command to generate the docker containers we need to run the watcher.
So let's get started.
1. Starting the services
In the command prompt, to bootstrap the KAG node, type the following:
Bash:
sudo ./setup.sh kag-mainnet 8001The first time you do this you'll see more output than this - don't worry about that. As long as everything says "done" then you're fine.
If you want to create the KAU watcher instead, then you need to enter kau-mainnet and 8000 on that setup.sh command. For the remainder of the steps below, you will need to enter kau-mainnet instead of kag-mainnet. If you are installing both blockchains, then you'll go through this process once with the KAG network code, then again with the KAU network code.
2. Database initialization
Bash:
sudo ./db-init.sh kag-mainnetThis will throw out a couple of screens of information, that will finish with something that looks like
Bash:
Successfully applied 56 integrationsNow we double-check that by typing:
Bash:
sudo ./exec.sh kag-mainnet dbThis gets us into the Database container. Once there we type:
Bash:
psql -h localhost --username=postgres --command="\l" | grep kag-mainnetIf the database was created correctly, it should be clear from the output:
If you do not see two lines representing Core and Horizon database installations, then the last command failed. Diagnose and fix the problem before continuing.
Now, press control-d or type exit to get out of the database docker container and back into your regular command shell.
exitNow, if you're not sure where you are, I'd like you to look at the previous screenshot above. Shells try hard to make it clear where you are and who you are (as this affects what powers you have), so in the first line of the screenshot above the shell is telling me:
- I'm logged in as 'derek' on a machine named 'kinesiswatcher'
- My current directory is the nodes directory underneath my home directory (the ~ is the shortcut for /home/derek)
- I currently am logged in as a regular user, and don't have administrative powers. The $ prompt means I'm a user. If I were the account with admin powers (called 'root') that dollar sign would turn into a #
- I'm now logged in as 'root' on the machine 54e9b48105cf (name created by docker-compose)
- The / means we're in the top directory, but that doesn't really matter for this process. This is equivalent to being at the c:\ folder in Windows.
- The # on the command line means I have root powers. I can do everything on this machine.
Conceptually, docker creates separate computers that you will be controlling. We'll be hopping in and out of them throughout this tutorial via the exec.sh script, so if you get an error you likely just lost track of where you are.
Again, the way to exit from one command prompt to another is to type 'exit' or use the shortcut control-d.
3. Catching Up
This step is a bit more complicated. What we need to do here conceptually is as follows:
- Figure out what the current block on the blockchain is. We will need to check an up-to-date blockchain node with our web browser and make note of this number.
- Have the Kinesis Core catch up to that block in chunks
- Configure the Kinesis Horizon server to ingest that data directly from existing nodes
- Then tell Horizon how much to import. We will be doing the entire blockchain, as this is what's most useful if you want to do things like reconcile the blockchain against the audits. You need all the data.
For the kag-mainnet, we need to open this page: https://kag-mainnet-arch-syd-node2.kinesisgroup.io/.well-known/stellar-history.json. For KAU, you can click here instead.
This is the number you're looking for:
This number will not be current when you install your node! A new block is created approximately every 5 seconds, and you want the current number. So open the page, and make a note of it.
Now, we will move into the Core docker container again and perform the catchup:
Bash:
sudo ./exec.sh kag-mainnet coreNow, once you're in the core (as indicated by the change in the prompt), type the following command (replacing 27552127 with the block number you got above):
Bash:
stellar-core catchup 27552127/512(Note that that's the current blockchain number, a forward slash, and the number 512.)
In a few seconds the process will finish, and as scary as "Application destructing" and "Application destroyed" may sound, if you see the following results then the process was a success.
Remember to type "exit" or control-d to exit.
Now, this step is a bit more complex. When I do this (I've done this a few times) I tend to type this up in a text document, then copy it and right-click it in a terminal to paste it.
So, enter the Horizon instance:
Bash:
sudo ./exec.sh kag-mainnet horizonAnd once there, enter the following, changing it as is appropriate for your installation:
Base Command from the github documentation
Bash:
export LEDGER_MAX=<LEDGER_MAX retrieved from HAS currentLedger>
export LEDGER_MIN=$((LEDGER_MAX - 512))
export ENABLE_CAPTIVE_CORE_INGESTION=true
horizon db reingest range $LEDGER_MIN $LEDGER_MAX
That's kind of ugly, right? LEDGER_MAX there is a variable that's replaced with whatever the current block number is that you found above. $LEDGER_MIN is probably 2 if you want the whole blockchain. So in my case this would be:
Bash:
export LEDGER_MAX=27552127
export LEDGER_MIN=2
export ENABLE_CAPTIVE_CORE_INGESTION=true
horizon db reingest range $LEDGER_MIN $LEDGER_MAX
Now, if you wanted to you could probably just remove the variables and insert the numbers directly:
Bash:
export ENABLE_CAPTIVE_CORE_INGESTION=true
horizon db reingest range 2 27552127
Whatever you want to do, go ahead and paste that into your terminal window. Then go grab a coffee or go for a run or something.
This is going to run for a long time - hours, maybe more. Be patient. At least it tells you something about where it is in the process.
As a reference, I rebuilt my KAU node yesterday, and I added --parallel-workers 4 to the command to run faster, and it took somewhere around 18 hours to complete. That's on a reasonably fast computer (I only gave that virtual machine 4 cores) and most of the time the unix load was around 11 or 12. It ran fine, but it takes a while, and if you're running it with one worker instead of 4 it will take longer still.
It's fine. Hopefully you only need to do this once.
I'll stop here and wait for the process to continue before resuming in the next post.
Attachments

Last edited:


